
Guidance
How to make each work product, and the drawing rules architects use. You will not know how to make some of these yet. Read the section, open the resources, practice on scrap paper — then make the real one.
Required: Research · Client profile · Brainstorming & sketching · Floor plan
Pick two: Exterior elevation · Interior design plan · Landscape plan · Cost analysis · Community plan · Model · Bergen County impact · Custom idea
Required 1 · Research
Before you design one, find out what real tiny homes are like. Look for homes that fit our limit: 650 sq ft or less. A 2,000 sq ft "small house" teaches you nothing about this project.
Keep your notes in your project notebook, organized by topic. Save the link for every fact so you can find it again.
What to find out
- Cost. What do tiny homes actually cost? Built by a company vs. built yourself?
- Size. How big are they, in square feet? How wide and tall?
- Common materials. What are the walls, roof, floors and siding made of?
- Construction techniques. How are they framed? How is a house fixed to a trailer?
- Sustainable options. What makes a tiny home greener?
- Luxury options. What do people add when money is no object?
- Types. What different kinds of tiny homes are there?
Three reasons people go tiny
These come from the Why Go Tiny? slideshow in class. Use them as a starting point for your research, not the end of it.
Less energy to heat and cool. Solar panels, recycled materials, composting toilets, rainwater storage.
Cheaper to build and own. Tiny house villages for people who need housing. Backyard units that earn rent.
Travel, minimalism, living off grid, or just a home built exactly for you.
Types of tiny homes
On wheels
Built on a trailer so it can move. Has to stay small enough to tow — about 8′-6″ wide and 13′-6″ tall.
On a foundation
Sits on the ground like a regular house. More freedom on width and height.
Backyard unit (ADU)
A second, small home on a property that already has a house. Often rented out or used for family.
Shipping container
A steel container converted into a home. Strong, stackable, and a fixed size you design around.
Bus, van or RV
A vehicle converted into a home. Built for travel.
Tiny house village
A group of tiny homes sharing land, paths and amenities.
Luxury ideas students have found: walk-in closets, bathtubs and double showers, a chef's kitchen, guest rooms, Murphy beds that fold into the wall, decks and patios, lofted bedrooms, stairs with storage built in, fold-out desks.
Required 2 · Client profile
To design anything well, you have to understand the person who will use it. Your client is the one person (or family) this tiny house is for. Every choice you make later should trace back to something in this profile.
You have two options:
Use a ready-made client
Watch the real tiny home owners in the four videos below and pick one. Capture as much detail as you can.
Make your own
Invent a client, or generate one with ChatGPT. Then make sure it answers every question in the template below.
- Client profile template and ready-made clientsGoogle Doc
- Client 1Video
- Client 2Video
- Client 3Video
- Client 4Video
What the profile has to answer
| Box | The question |
|---|---|
| Name & location | Who are they, and where will the house be? Climate changes the design. |
| Background | Age, family, job, interests. |
| Values | What do they care about most? List a few things. |
| Wants | Features they would like in the house. |
| Needs | Features they must have. The house fails without these. |
| Tradeoffs | What can they live without? In 650 sq ft, something has to go. |
| Limitations | Budget, health, pets, a job that needs a desk, a bad knee that rules out ladders. |
| Style | What look would they choose? Modern, rustic, cottage, industrial, Japandi… |
Two clients from past students
The retired teacher
68, a retired literature teacher, downsizing to a quiet reading retreat near nature. Cottage style: warm wood, soft colors, cozy nooks. Needs: a bed on the ground floor — no climbing into a loft — built-in bookshelves, a reading nook by a big window, a small kitchen with a tea station, an outdoor sitting porch, and a wide, accessible bathroom.
The environmental consultant
34, loves hiking and gardening, wants the smallest footprint she can manage. Japandi style: natural wood, earthy colors, uncluttered space. Needs: solar panels, rainwater collection, a composting toilet, eco-friendly materials, and smart storage so the small space still works for cooking, working and relaxing.
Notice how the profile drives the plan. The retired teacher's "no climbing" became a ground-floor bedroom. The consultant's off-grid needs became solar panels on her elevation drawings and a rain tank on the back wall. If you can't point to the line in your profile that explains a design choice, ask yourself why you made it.
Required 3 · Brainstorming and sketching
Generate lots of ideas, quickly. These are not final drawings. They are how you find the good layout before you spend hours drawing it properly.
Start with bubble diagrams, then turn your best bubbles into rough floor plan sketches.
Bubble diagrams
A bubble diagram is a map of how the rooms relate — no walls, no measurements. Draw one bubble per space, sized by how much room it needs. Then connect the bubbles that need to be next to each other.
Floor plan sketches
Take your best bubble diagrams and sketch them as rough floor plans. Draw several different layouts. Label every room and the big furniture. Write notes beside each one: what works, what worries you. Then pick a winner and say why.
Keep the size honest. A sketch can be rough, but if it would be 900 sq ft drawn properly, it is not a tiny house sketch.
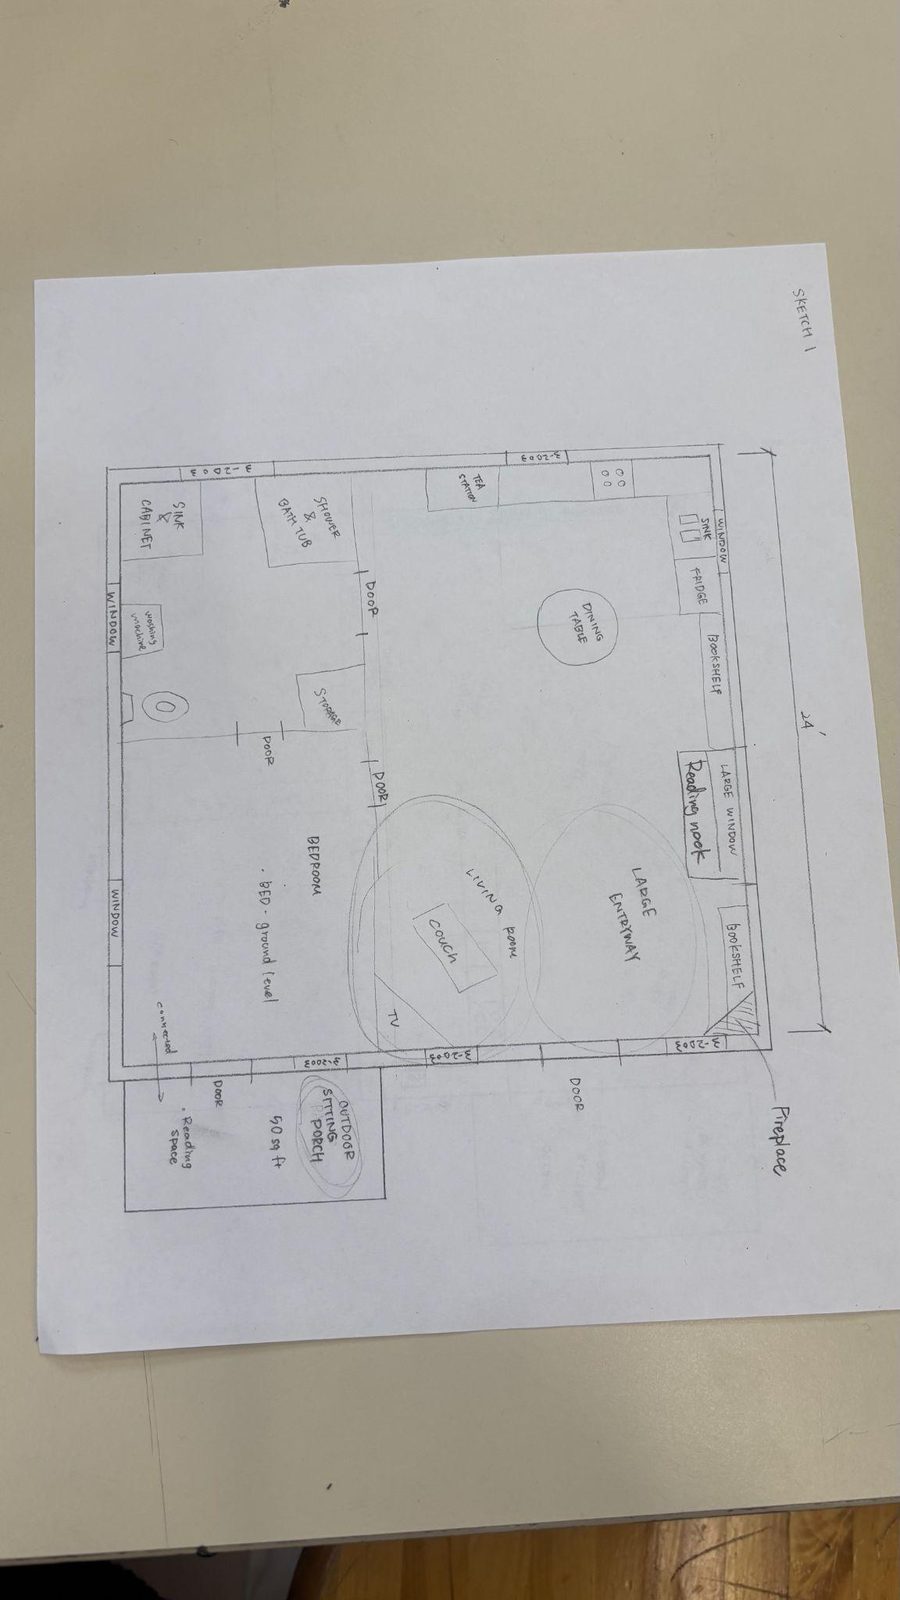
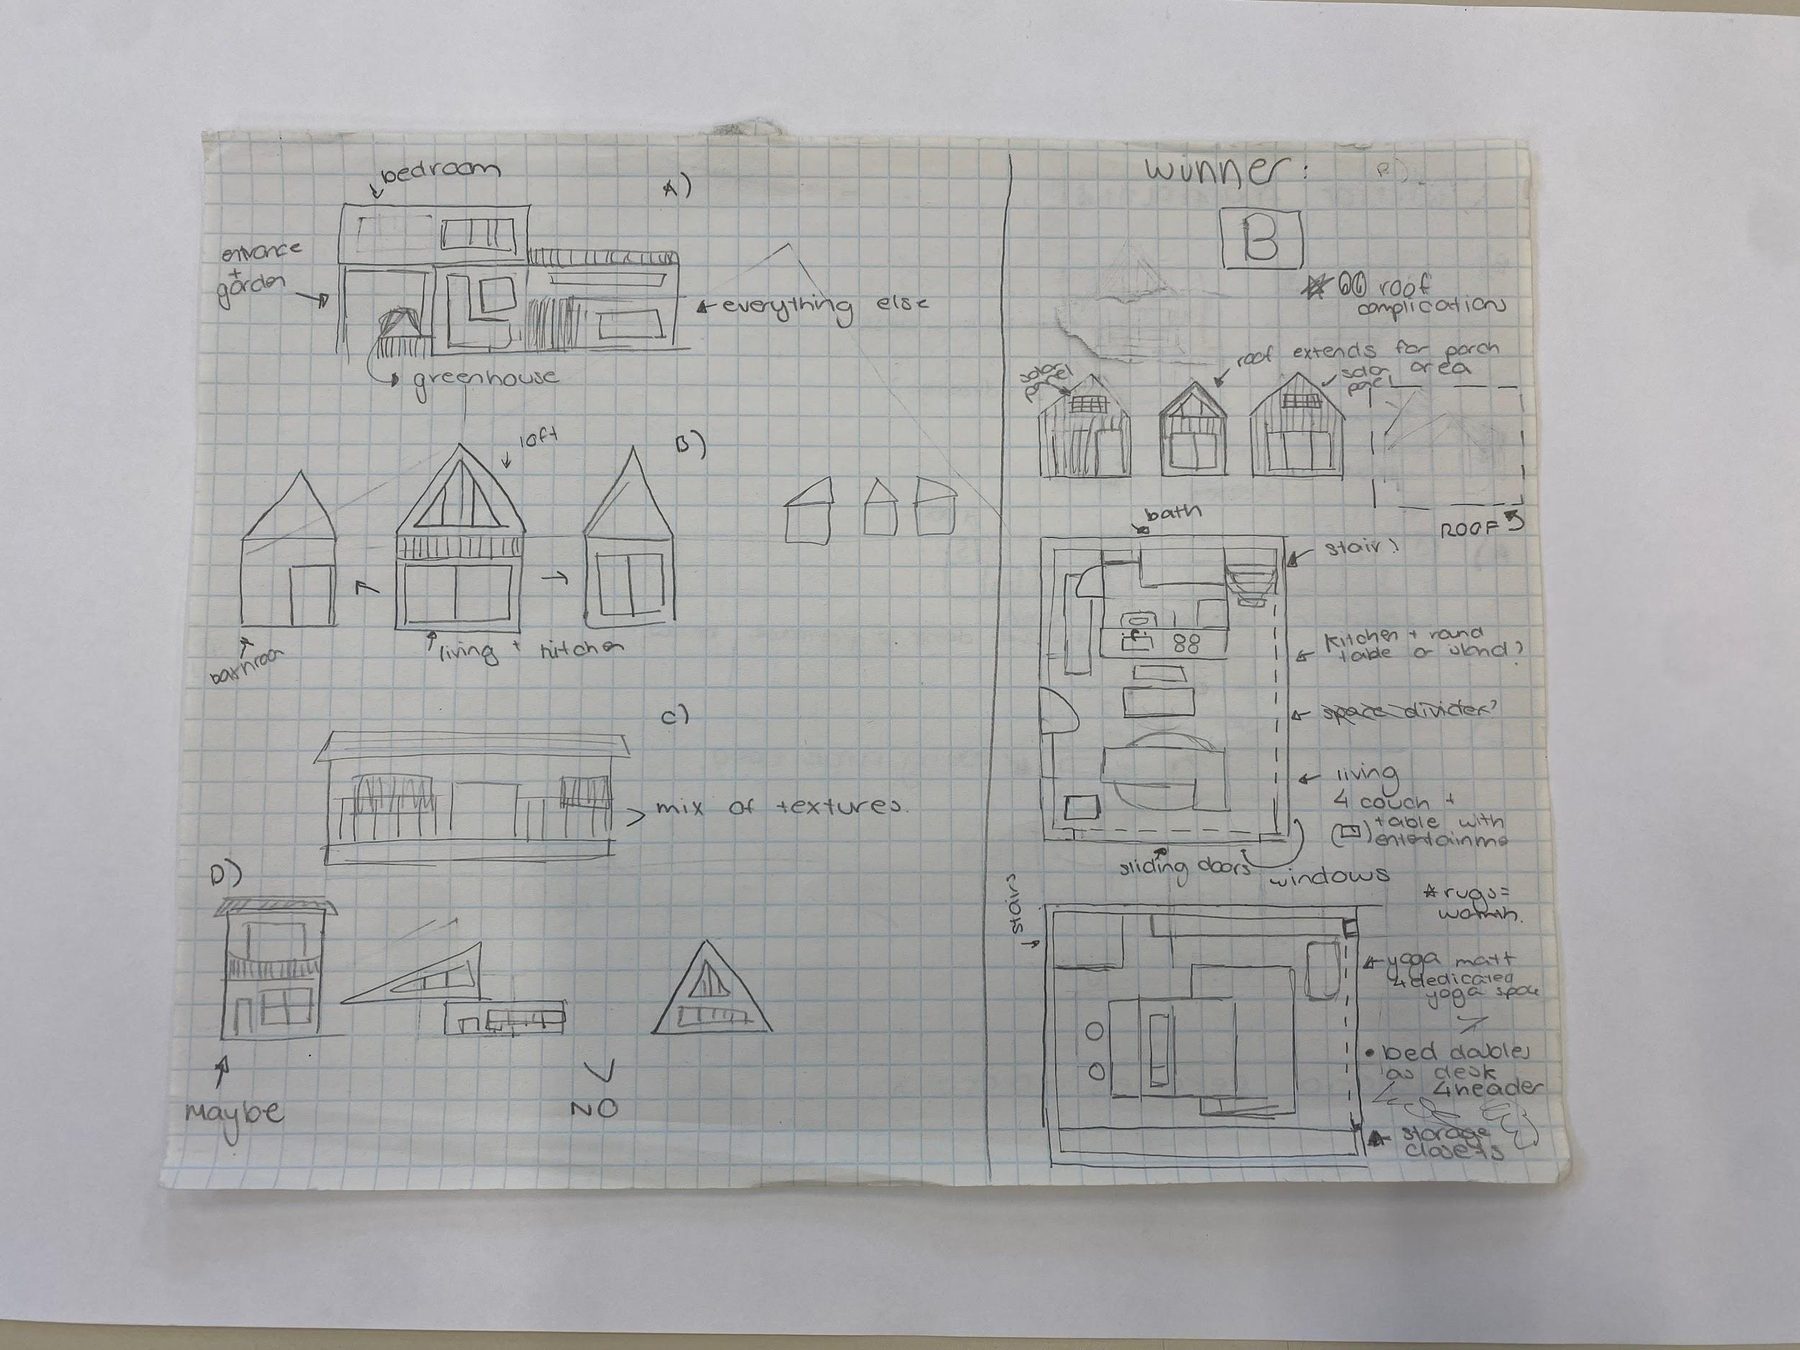
- Best practices for generating ideas, sketches, diagrams and perspective sketchesGoogle Drive
- Example of a floor plan sketchImage
A hand sketch of a 246 sq ft trailer house. Rough lines, but every room, window and loft is labeled and the main dimensions are there.
Required 4 · The floor plan
The floor plan is the most important drawing an architect makes. Picture slicing the whole house horizontally about 4 feet above the floor, lifting the top off, and looking straight down. Everything you cut through — walls, doors, windows — is drawn dark. Everything below the cut — counters, toilets, stairs, furniture — is drawn lighter. Anything above the cut, like a loft, is drawn dashed.
Use the floor plan guide PDF (link at the end of this section) alongside this page. It is a great resource for what a good floor plan looks like and how to draw one.
Pick a scale
Houses are usually drawn at 1/4″ = 1′-0″: every foot of house becomes a quarter inch on paper. Past students have also used 3/8″ = 1′-0″ to fill a bigger sheet. Pick one, use it for the whole drawing, and write it in your title block.
Count feet, divide by 4, and you have inches on paper.
Draws at about 2-1/8″ × 6″. Fits on letter paper easily.
650 sq ft. Draws at 6-1/4″ × 6-1/2″. Still fits on letter paper.
Not a rectangle? Split the plan into rectangles, find each area, and add them up. Write the total under the drawing title, like "204 SQ FT". If you have a loft, list it separately: "Main floor ___ sq ft, loft ___ sq ft".
Line weights
A floor plan uses at least three line weights so it reads at a glance. Press hard for walls, medium for things below the cut, light for dimensions. If every line is the same, nobody can tell a wall from a countertop.
Walls have real thickness
A wall is not a single line. Most houses are framed with 2×4 studs, which are actually 3-1/2″ wide. Add 1/2″ drywall on each side and an interior wall is about 4-1/2″ to 5″ thick. Exterior walls carry insulation and siding, so draw them about 6″ to 8″ thick.
At 1/4″ scale, a 6″ exterior wall is about 1/8″ on paper. Draw both faces of every wall, then shade or hatch between the lines to show the framing material.
Symbols
Architects draw the same things the same way, so any builder can read any plan. Doors are drawn open, with a thin arc showing which way they swing. Door size is written as a small number like 3⁰, meaning 3′-0″ wide.
Dimensions
Dimensions are what make a drawing buildable. Draw every dimension with a ruler, outside the plan where you can, so the inside stays clear. Use two or three strings of dimensions around the outside, from big to small:
- Outermost: the overall size of the house.
- Next one in: where the walls are, and the centerlines of doors and windows.
- Closest (if needed): small details — jogs in a wall, cabinets, fixtures.
Putting it together
A small trailer tiny house, drawn the way yours should be. Walls dark, fixtures medium, dimensions light, the loft dashed, a north arrow, and a title with the scale and square footage.
Two floor plans from past students
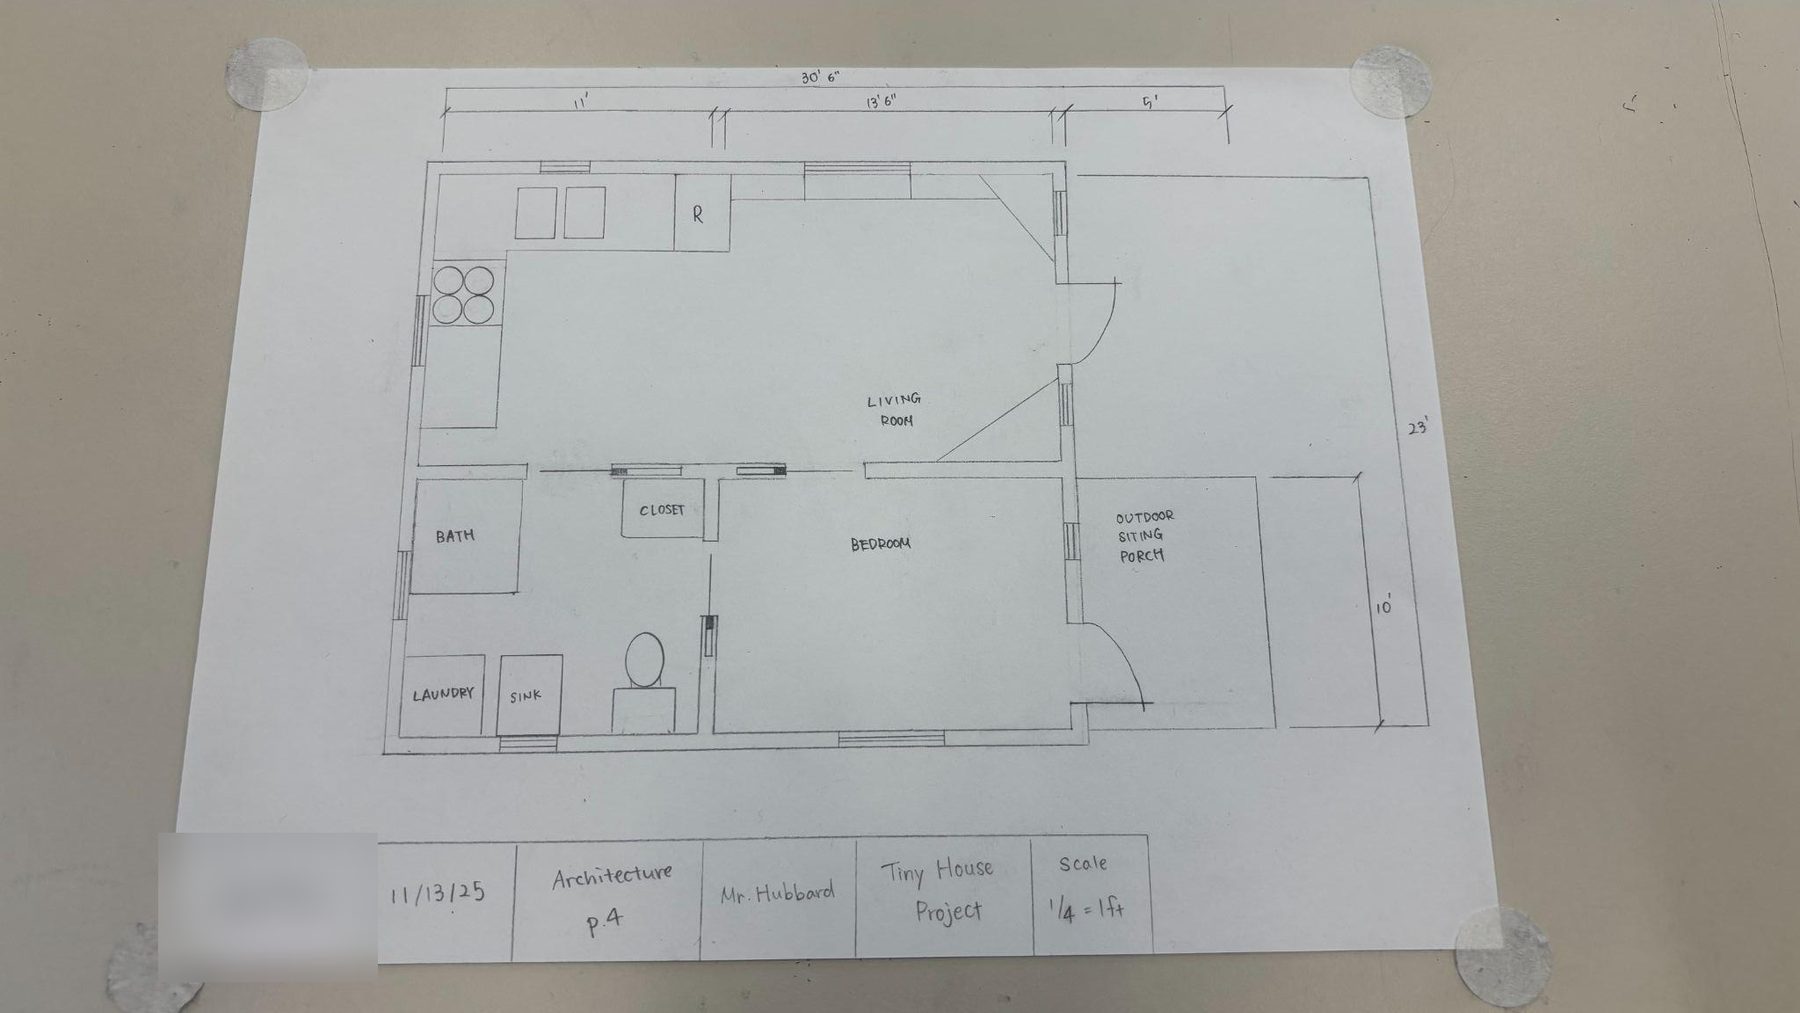
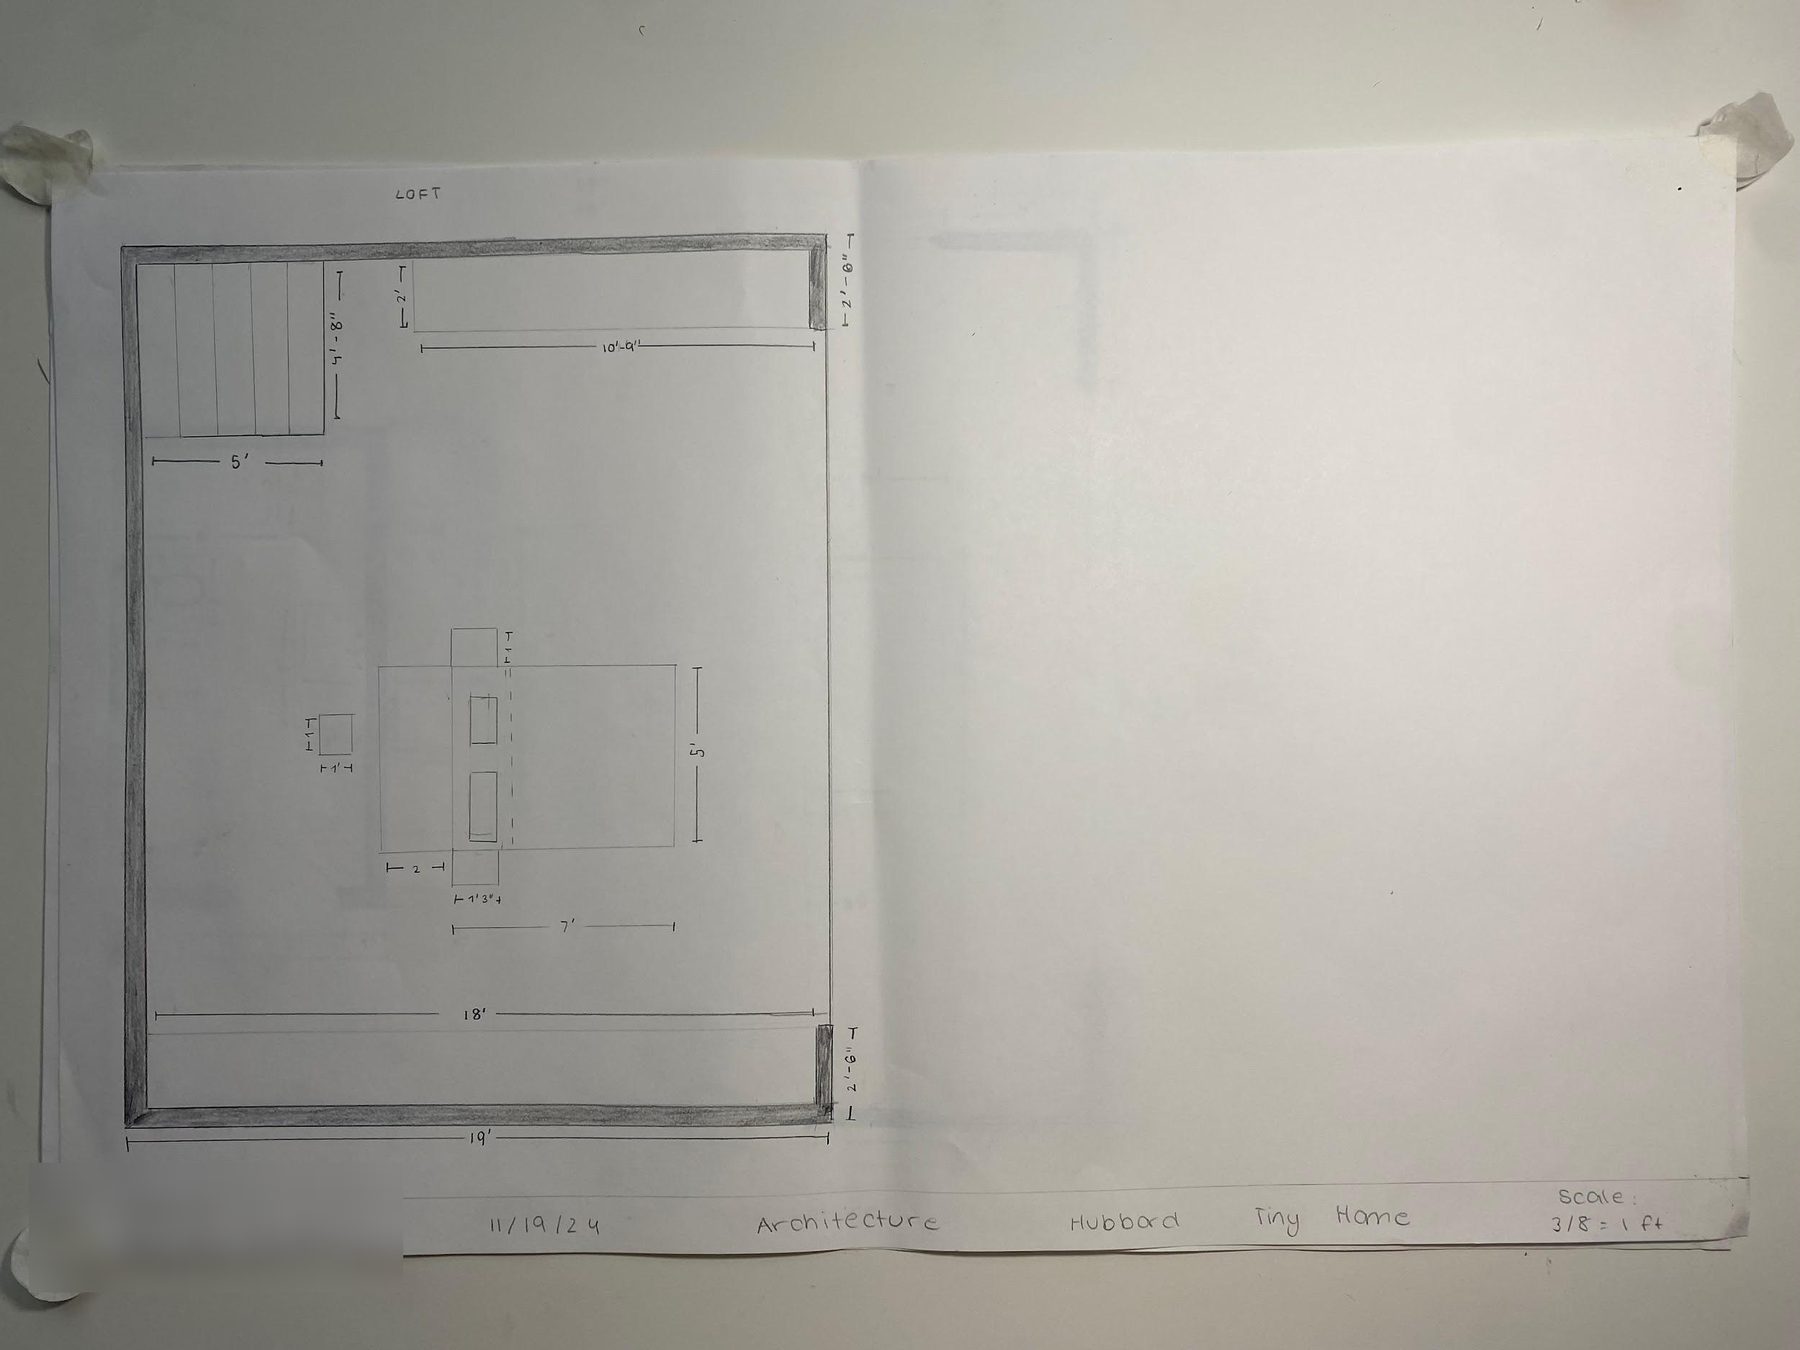
The overview page shows the other student's main floor: 24′ × 27′ = 648 sq ft, shaded walls, and a dimension on nearly everything. Her loft got its own drawing:
Lofts and second levels
Two ways to show a loft. On the main floor plan, draw its edge as a dashed line and label it "LOFT ABOVE." Or draw a separate loft plan, at the same scale, with the stairs in the same place on both sheets. Label stairs "UP" on the lower floor and "DN" on the upper one.
Before you hand it in
- Drawn to scale with a ruler, and the scale is written on the sheet
- 650 sq ft or less, and the square footage is written under the title
- Walls drawn with real thickness and shaded or hatched
- Three line weights: dark walls, medium fixtures, light dimensions; dashed for anything above
- Every door shows its swing (or slide). Every window is drawn in the wall
- Bathroom, kitchen and stairs use the standard symbols. Stairs say UP or DN
- Every room is labeled. Rooms are sized for real furniture
- Dimensions outside the plan: overall size, then walls, doors and windows
- Leader lines are labeled
- North arrow
- Title block: name, date, class, teacher, project title
- The style fits my client, not just me
- Floor plan conventions guideGoogle Drive
The full chapter: line weights, wall types, every door and window symbol, dimensioning, and a complete checklist.
- Example tiny house floor planImage
A professional plan for a trailer tiny house. Look at the dimension strings along the top and bottom.
Pick two more
Choose two of the products below. Each one has its own rubric row on the scoring page. Read the whole section before you start — most of these need research and practice first.
Exterior elevation
An elevation is a flat, straight-on view of one side of the house. No perspective, no vanishing points. Because nothing is distorted, it shows true heights — which a floor plan can't. It also shows what the outside is made of: siding, roofing, windows, doors.
Name each elevation by the direction it faces — North, South, East, West — or Front, Rear, Left, Right. Write the scale directly under the title. Draw it at the same scale as your floor plan, or one that fits the sheet.
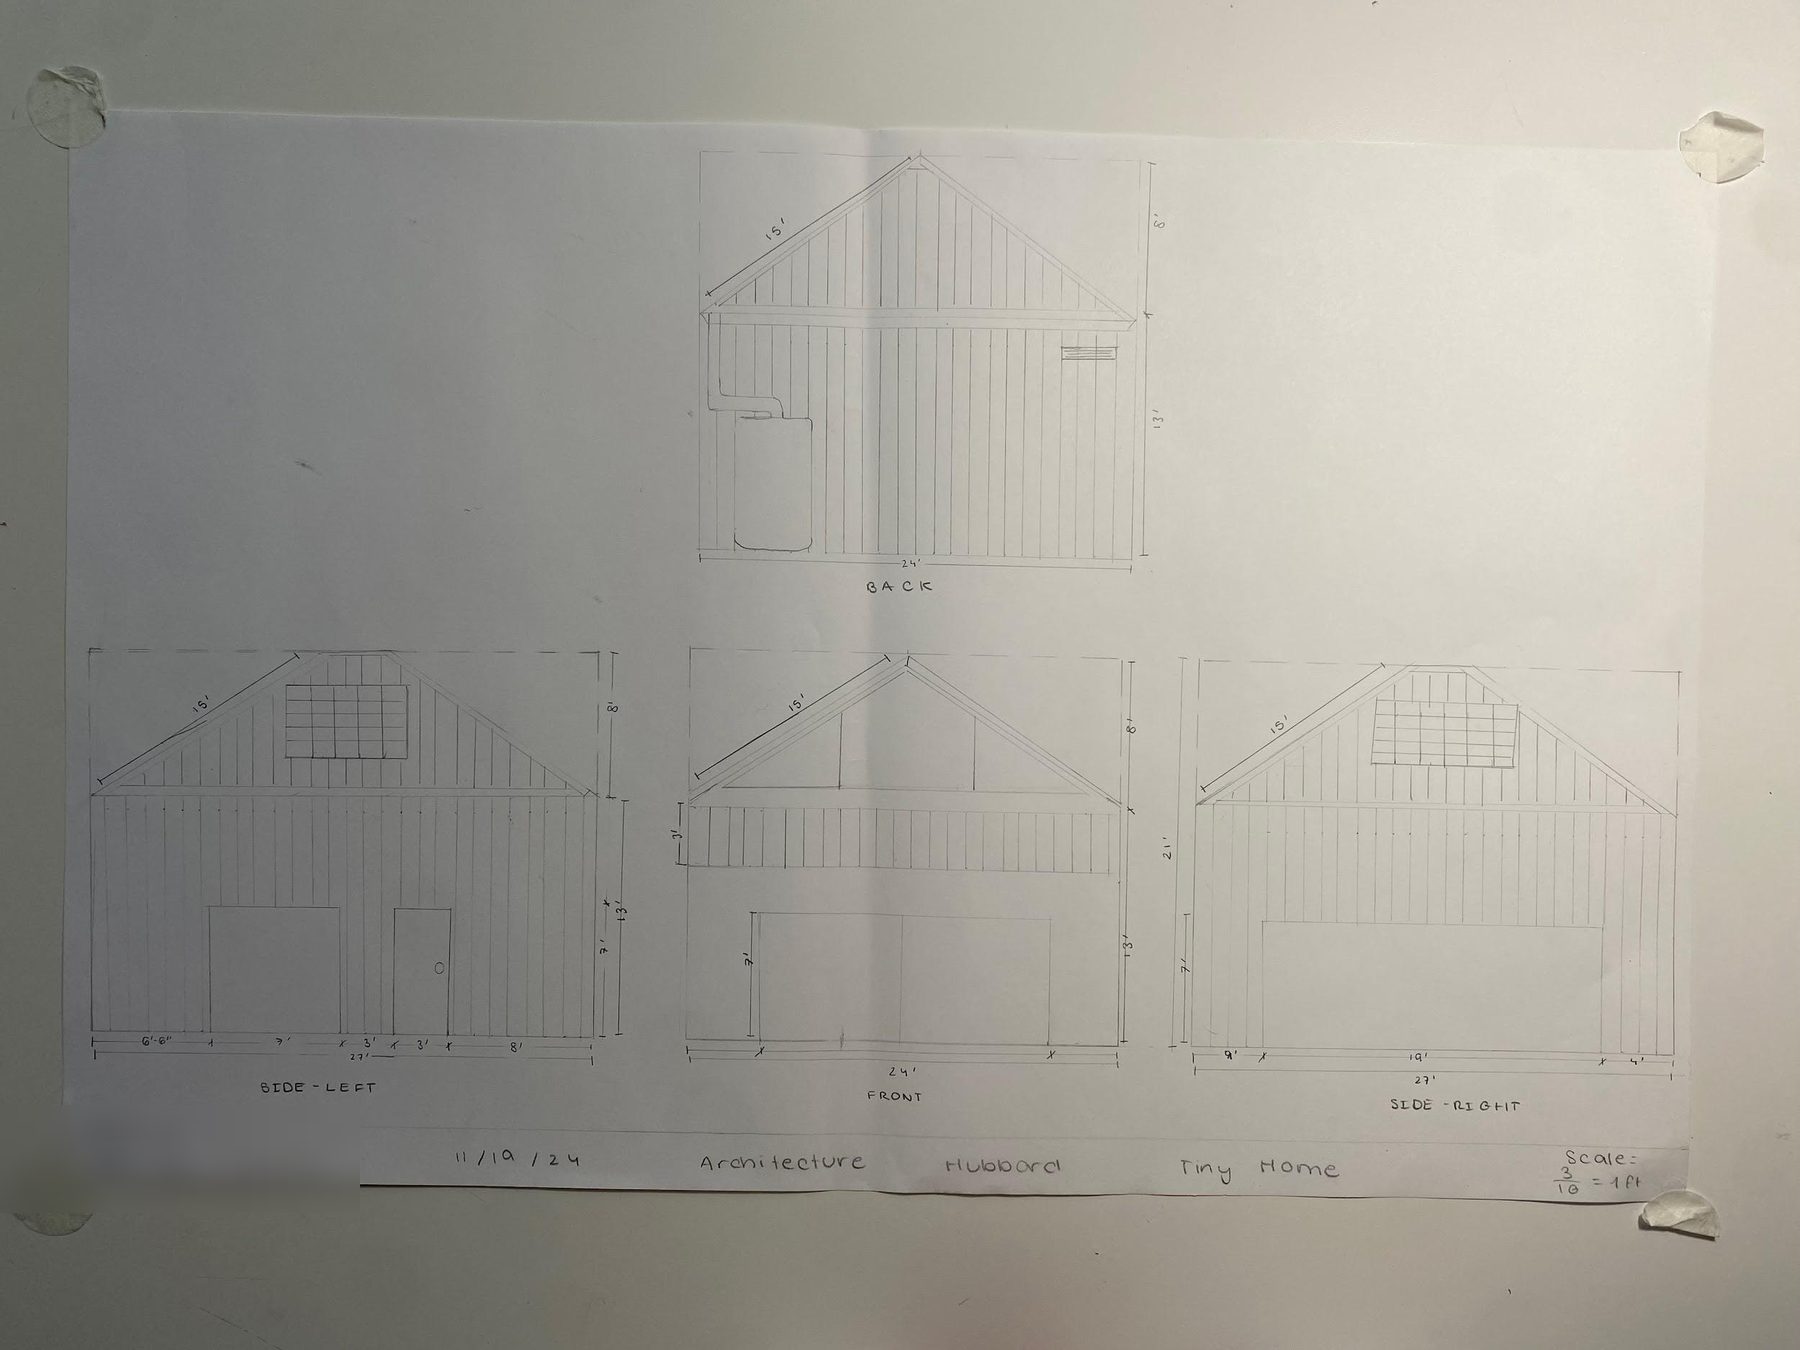
Drawn to scale with a ruler. Each view labeled, with a title block. Textures that show the materials — siding, roofing, trim. Major dimensions: overall length, wall height, and total height.
- Example exterior elevationsImage
A professional set: front, rear, left and right, each titled with its scale.
- Elevations guideGoogle Drive
The chapter on drawing exterior and interior elevations.
Interior design plan
Two parts: one interior elevation, and a design board of samples.
An interior elevation is a straight-on view of one wall inside the house — the kitchen, the living room, a lounge. It shows what a floor plan can't: how high the counters are, where the upper cabinets start, what the backsplash is made of. Mark which wall you drew with an elevation marker on your floor plan, like the circled 1 on the example plan.
The design board is where the room comes alive. Collect picture samples of the actual things you would put in the space: paint colors, wallpaper, flooring, textures, furniture, lights. Arrange them on one page with labels. Every choice should fit your client's style.

One interior elevation (kitchen, living room, lounge…) that follows the elevation rules: drawn straight on, to scale, titled, with heights dimensioned and materials labeled. Plus picture samples: paint colors, wallpaper, textures, furniture.
- Procedures and best practices for interior elevationsGoogle Drive
- Example design boardImage
A family room and kitchen board: a numbered floor plan, a color palette, and a sample of every finish and piece of furniture.
Landscape design plan
A landscape plan is a floor plan of the yard: the property seen from straight above, with the house as a simple outline. It shows where every tree, garden bed, path and patio goes.
Draw it to scale with a ruler, then color it — green for lawn and plants, browns and greys for paving and gravel. Trees are drawn as circles the size of their full-grown canopy. Label each plant with its actual species ("red maple", "boxwood"), and each hard surface with its material ("pea gravel", "brick pavers").
Think about your client. A gardener wants beds and a water source. A retired reader wants a shady spot to sit. Off-grid clients might want a rain garden.

Drawn to scale with a ruler, with neat lines of the right type. Drawn in color. Tree and bush species, and gravel or brick types, all labeled.
- How to plan a landscape designArticle
Best practices. Read it before you start.
- Example landscape planImage
A small yard, in color, with every plant labeled by species and the lawn, patio and walkways sized in square feet.
Cost analysis plan
What would it actually cost to build your tiny house? First research what tiny houses cost in general. Then price the specific materials and appliances in your design.
Organize it so someone can read it in a minute: a table, grouped by category, with a total at the bottom. Write down where every price came from.
| Category | Item | Qty | Each | Total | Source |
|---|---|---|---|---|---|
| Walls | 2×4 studs, 8 ft | $ | $ | link | |
| Flooring | by the square foot | $ | $ | link | |
| Siding | $ | $ | link | ||
| Roofing | $ | $ | link | ||
| Patio / outdoor | $ | $ | link | ||
| Appliances | fridge, range, water heater… | $ | $ | link | |
| Furnishings | bed, bedding, sofa… | $ | $ | link | |
| Total | $ |
A layout to copy, not a price list. Fill in real prices for the materials in your design. Your floor plan tells you quantities: wall lengths, square feet of floor, number of windows.

- Research on tiny house costArticle
A real builder's cost breakdown. Start here for the general research.
- Tiny house materials listArticle
Use it to find the specific costs of the house you designed.
Tiny house community plan
Zoom out. Design a piece of land with several tiny houses on it — a tiny house village. Draw the whole plot from above, to scale, with its total size dimensioned accurately.
Place the houses so each one gets light, privacy and a way in. Then design what they share: pathways, gardens, a common building, parking, places to play or sit outside.

The total plot size, dimensioned accurately. Several houses placed on it. Any other community amenities. Pathways, gardens and outdoor activities.
- Tiny house communitiesArticle
Real communities, and how they place multiple houses on one piece of land.
Mixed material model
Build your tiny house in foam board at the same scale as your floor plan. That means you can lay your floor plan down as the base and build the walls right on top of it.
Build exterior walls, interior walls, and the details that make it real: countertops, lofts, stairs. Then make it rich in detail with color-printed patterns and other materials: print wood siding or tile and glue it on, use clear plastic for windows.
You get one piece of foam board. Plan your cuts before you make them. You can buy more if you want to.
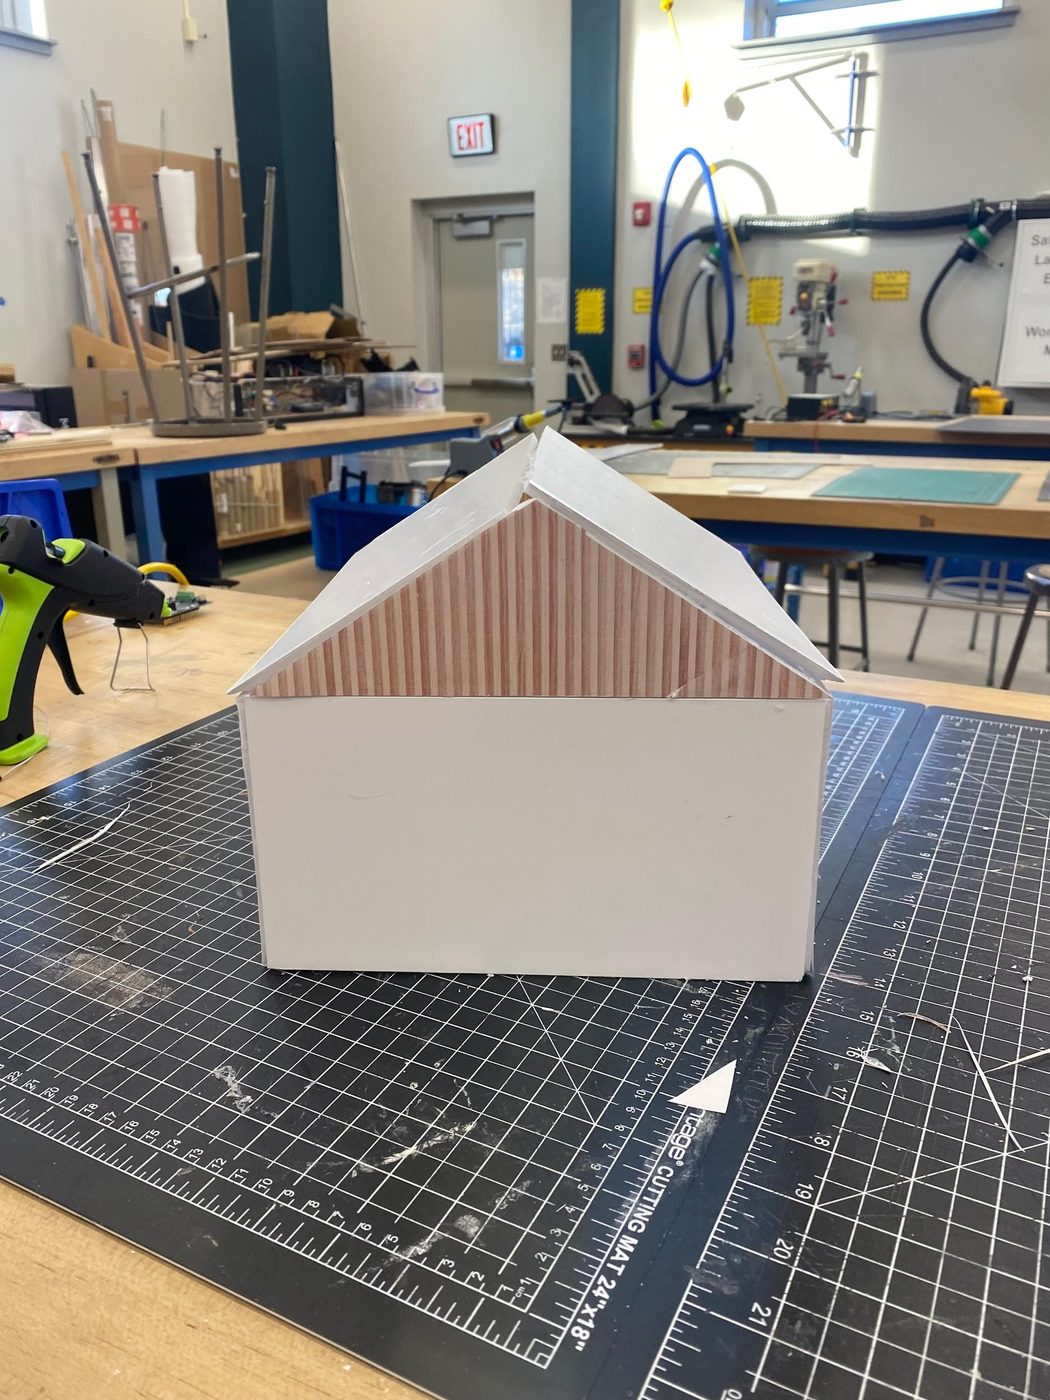

Hobby knives cause most of the injuries in this room. Always cut on a mat, pull the blade along a straight edge with your fingers behind it, and make several light passes instead of one deep one. See shop safety.
Foam board is thick. At 1/4″ scale, a 3/16″ board is a 9-inch wall — close to a real exterior wall. Decide whether your walls sit inside or outside your plan's wall lines before you cut, or every room comes out the wrong size. The Desktop Organizer guidance shows both ways to join corners.
Bergen County community impact
A research proposal, not a drawing. Find a real place in Bergen County that could become a tiny home community, and make the case for it.
- Where? Identify a real space. Include maps.
- Who would live there? Low-income families, people experiencing homelessness, seniors, young people leaving foster care…
- What would it do to the town? Research how communities have actually responded when low-income housing was proposed nearby.
- What would it cost taxpayers? Research it, then make a simple proposal for paying for it.
- A real tiny home village applicationPDF
How one city in Oregon proposed a tiny home village. Use it as a model for what your plan should cover.
Custom idea
Have another way to show part of your design? A 3D model in Onshape, a video walkthrough, a perspective rendering, a working mechanism like a fold-down bed? Talk to Mr. Hubbard before you start. You'll agree together on what it has to include.
The presentation
Projects are scored during your presentation. Bring every product: the four required ones and your two picks. Photograph your drawings in good light, straight on, with the whole sheet in frame — a blurry photo of a good floor plan scores like a bad floor plan, because nobody can read it.
Start with your client. Every design choice you show should connect back to who they are.